Create a React dapp with global state
This tutorial walks you through integrating a React dapp with MetaMask. The dapp has multiple components and requires managing the state globally. You'll use the Vite build tool with React and TypeScript to create the dapp.
We recommend starting with creating a React dapp with local state, which introduces EIP-6963. The tutorial demonstrates how to iterate over all discovered providers, connect to the selected wallet, and remember the selection within a single component.
If you skip the tutorial, consider reviewing wallet interoperability to understand how multiple injected wallet providers work.
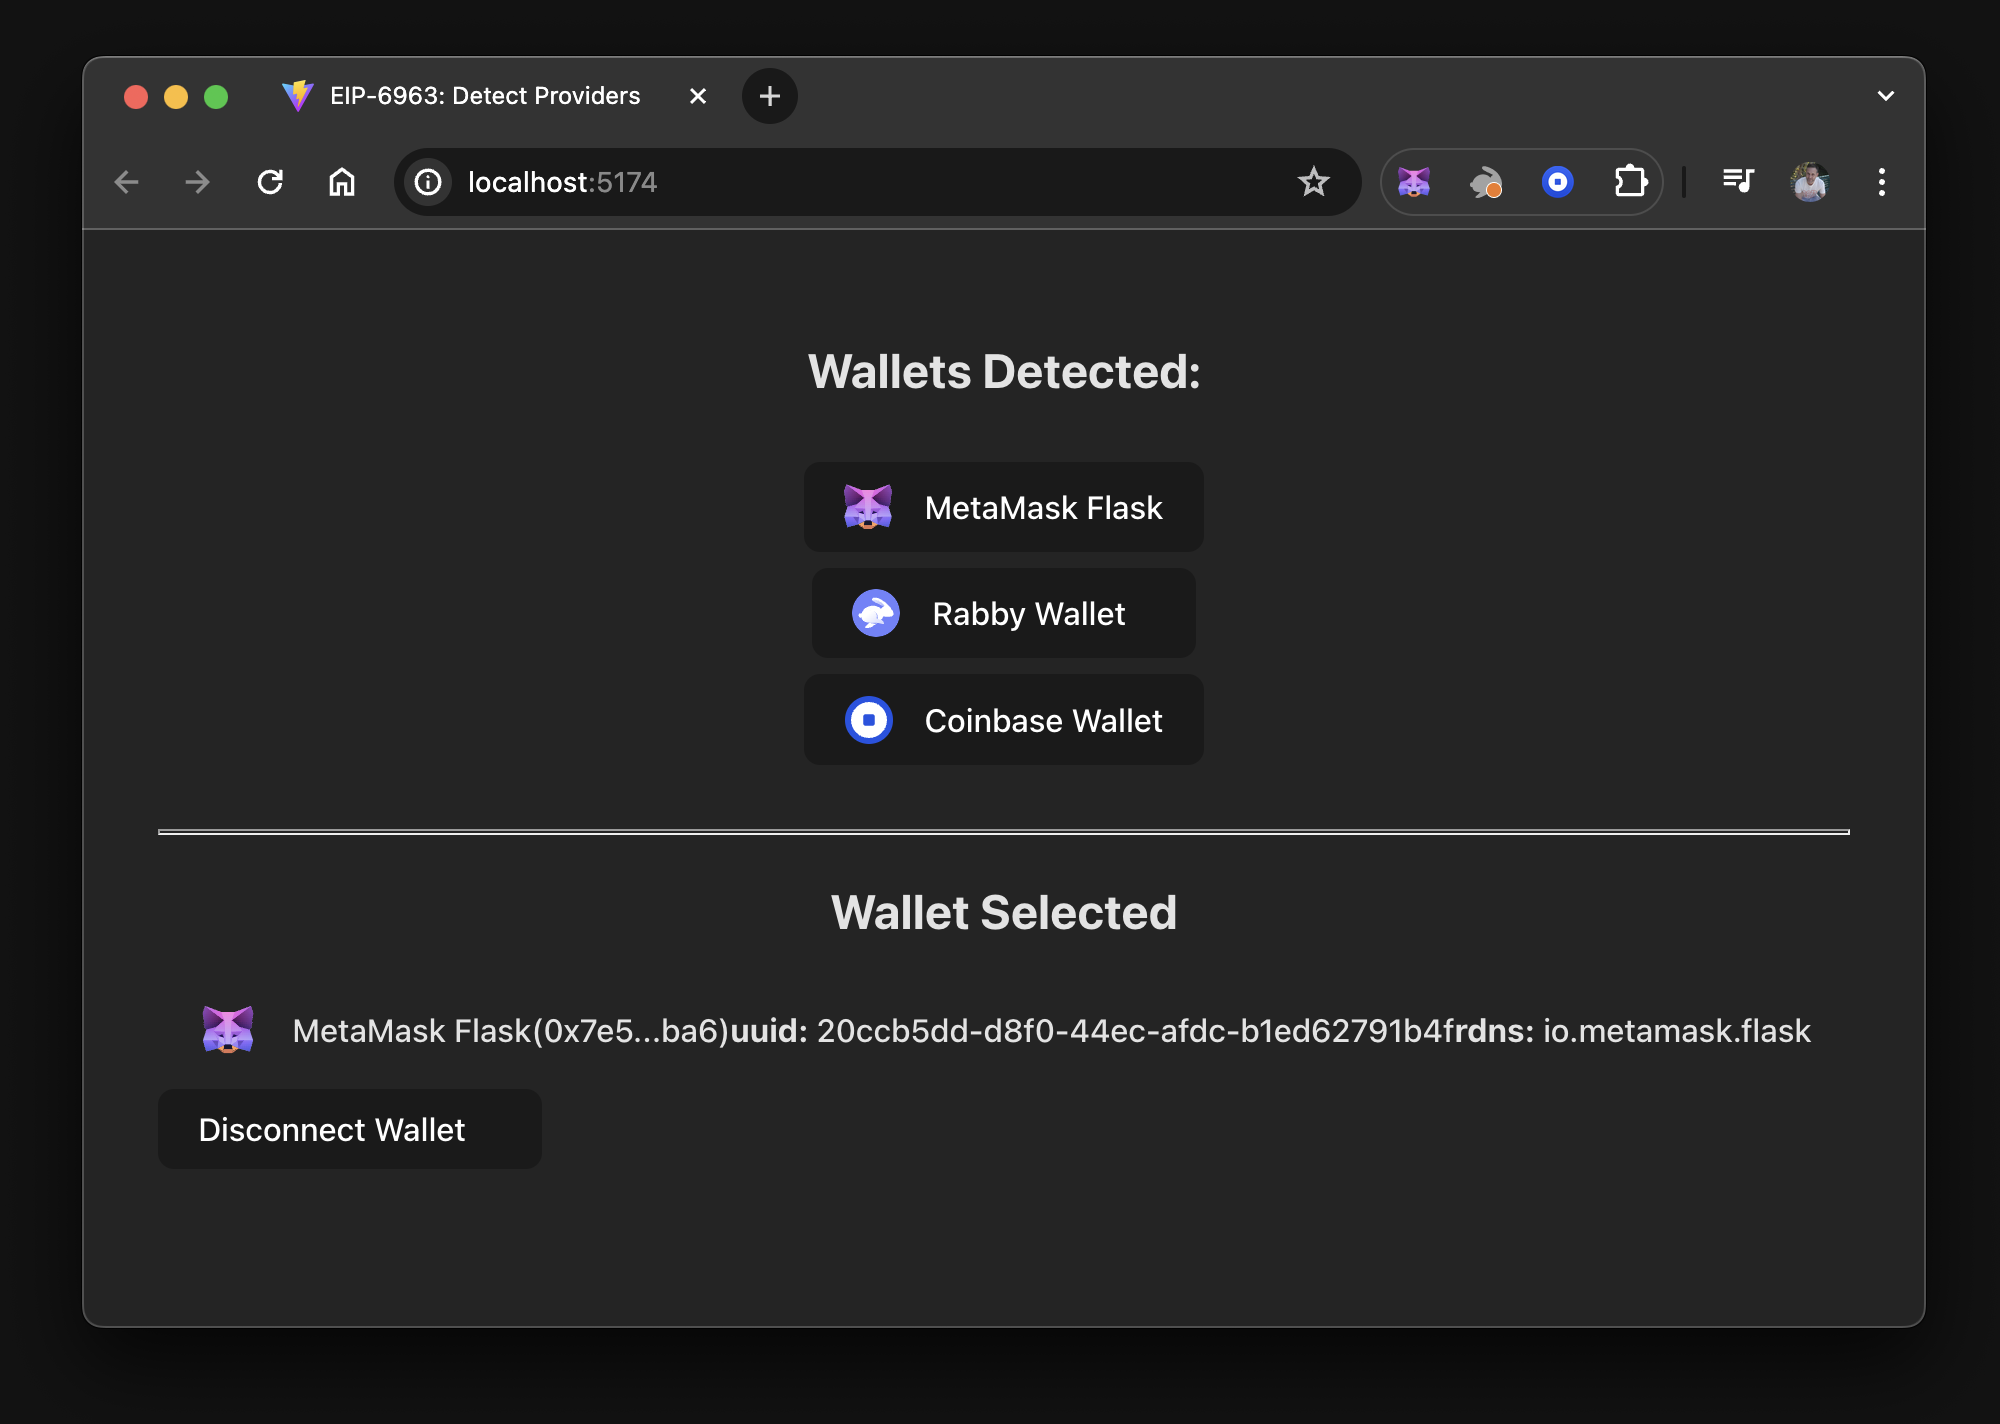
In real-world use cases, a dapp shares state across many components. This tutorial is more complex than the tutorial to create a dapp in a local state because it addresses real-world scenarios. The dapp you create using this tutorial will look similar to the following:
In this tutorial, the state is put into a React Context component, creating a global state that allows other components and UI elements to benefit from its data and functions.
You'll also use localStorage to persist the selected wallet, ensuring the last connected wallet
state remains intact even after a page refresh.
This tutorial addresses the edge case where a browser wallet may be disabled or uninstalled between
refreshes or visits to the dapp.
A disconnect function is added to reset the state and you can use
wallet_revokePermissions to properly disconnect from MetaMask.
You can view the dapp source code on GitHub.
Prerequisites
- Node.js version 18+
- npm version 9+
- A text editor (for example, VS Code)
- The MetaMask extension installed
- Basic knowledge of TypeScript, React, React Context, and React Hooks
Steps
1. Set up the project
This project introduces a new structure, independent of previous tutorials. Instead of reusing code or states, this tutorial guides you through breaking down the single-component structure into multiple components.
Create a new ViteJS project and add the necessary directory structure:
npm create vite@latest vite-react-global-state -- --template react-ts
Install the node module dependencies:
cd vite-react-global-state && npm install
Launch the development server:
npm run dev
The terminal displays a localhost URL, which you can use to view the dapp in your browser.
If you are using VS Code, you can run the code . command to open the project.
If the development server stops, you can use the npx vite or npm run dev command to re-run your project.
After you open the ViteJS React project in your editor of choice, add three directories within the
src directory.
Create a src/components, src/hooks, and src/utils directory in the root of the project using
the following commands:
mkdir src/components && mkdir src/hooks && mkdir src/utils
Create components for listing installed wallets, displaying connected wallet information, and handling errors. Additionally, create a CSS module for each component:
Create the following files in src/components:
SelectedWallet.module.cssSelectedWallet.tsxWalletError.module.cssWalletError.tsxWalletList.module.cssWalletList.tsx
Create the following files in src/hooks:
Eip6963Provider.tsxuseEip6963Provider.tsx
Create the following file in src/utils:
index.ts
Styling
Add the following CSS code to SelectedWallet.module.css:
.selectedWallet {
  display: flex;
  flex-flow: row nowrap;
  justify-content: flex-start;

  padding: 0.6em 1.2em;
  margin-bottom: 0.5em;

  font-family: inherit;
  font-size: 1em;
  font-weight: 500;
}
.selectedWallet > img {
  width: 2em;
  height: 1.5em;
  margin-right: 1em;
}

.providers {
  display: flex;
  flex-flow: column wrap;
  justify-content: center;
  align-items: center;
  align-content: center;

  padding: 0.6em 1.2em;
}
Add the following CSS code to WalletError.module.css:
.walletError {
  margin-top: 1em;
  border-radius: 0.5em;
  height: 36px;
  padding: 16px;
  color: #EFEFEF;
  background-color: transparent;
  user-select: none;
}
Add the following CSS code to WalletList.module.css:
.walletList {
  display: flex;
  flex-direction: column;
  align-items: center;
}
Append the following code to the end of src/index.css:
/* added css */
:root {
  text-align: left;
}

hr {
  margin-top: 2em;
  height: 1px;
}

button {
  min-width: 12em;
  display: flex;
  flex-flow: row nowrap;
  justify-content: flex-start;

  align-items: center;
  border-radius: 0.5em;
  margin-bottom: 0.5em;
  border: 1px solid transparent;
}

button > img {
  width: 1.5em;
  height: 1.5em;
  margin-right: 1em;
}

button:hover {
  border-color: #75079d;
}

button:first-child {
  margin-top: 0.5em;
}
button:last-child {
  margin-bottom: 0;
}
Project structure
You now have some basic global and component-level styling for your application.
The directory structure in the dapp's /src directory should look similar to the following:
├── src
│   ├── assets
│   ├── components
│   │   ├──  SelectedWallet.module.css
│   │   ├──  SelectedWallet.tsx
│   │   ├──  WalletError.module.css
│   │   ├──  WalletError.tsx
│   │   ├──  WalletList.module.css
│   │   └──  WalletList.tsx
│   ├── hooks
│   │   ├── WalletProvider.tsx
│   │   └── useWalletProvider.tsx
│   ├── utils
│   │   └── index.tsx
├── App.css
├── App.tsx
├── index.css
├── main.tsx
├── vite-env.d.ts
2. Import EIP-6963 interfaces
The dapp connects to MetaMask using EIP-6963.
EIP-6963 introduces an alternative wallet detection
mechanism to the window.ethereum injected provider.
This alternative mechanism enables dapps to support
wallet interoperability by discovering multiple injected
wallet providers in a user's browser.
Update the Vite environment variable file, src/vite-env.d.ts, with the types and interfaces
needed for EIP-6963 and
EIP-1193:
/// <reference types="vite/client" />

interface EIP1193Provider {
  isStatus?: boolean
  host?: string
  path?: string
  sendAsync?: (request: { method: string, params?: Array<unknown> }, callback: (error: Error | null, response: unknown) => void) => void
  send?: (request: { method: string, params?: Array<unknown> }, callback: (error: Error | null, response: unknown) => void) => void
  request: (request: { method: string, params?: Array<unknown> }) => Promise<unknown>
}

interface EIP6963ProviderInfo {
  rdns: string
  uuid: string
  name: string
  icon: string
}

interface EIP6963ProviderDetail {
  info: EIP6963ProviderInfo
  provider: EIP1193Provider
}

type EIP6963AnnounceProviderEvent = {
  detail:{
    info: EIP6963ProviderInfo,
    provider: Readonly<EIP1193Provider>
 }
}

interface WalletError {
  code?: string
  message?: string
}
This also adds an interface for WalletError.
3. Build the context provider
This section of the tutorial explains how to create the React Context component using various types, interfaces, functions, hooks, events, effects, and RPC calls. The React Context component wraps your application, providing all components access to the state and functions required to modify the state and manage connections to discovered wallets.
To do this, you must first import the necessary context. Then, define a type alias for a record where the keys are wallet identifiers and the values are account addresses or null.
Next, define the context interface for the EIP-6963 provider. The interface includes the following:
- A list of wallets, represented as a record of wallets by
runs. - The selected wallet, of type
EIP6963ProviderDetail. - The chosen account address, represented as a string.
- An error message, also represented as a string.
- Functions to connect and disconnect wallets.
Add the following code to src/hooks/WalletProvider.tsx to import the context, define the type alias,
and define the interface:
import { PropsWithChildren, createContext, useCallback, useEffect, useState } from "react"
type SelectedAccountByWallet = Record<string, string | null>
interface WalletProviderContext {
  wallets: Record<string, EIP6963ProviderDetail>
  selectedWallet: EIP6963ProviderDetail | null
  selectedAccount: string | null
  errorMessage: string | null
  connectWallet: (walletUuid: string) => Promise<void>
  disconnectWallet: () => void
  clearError: () => void
}
Add the following code to src/hooks/WalletProvider.tsx to extend the global WindowEventMap interface
with the custom eip6963:announceProvider event:
declare global{
  interface WindowEventMap {
    "eip6963:announceProvider": CustomEvent
  }
}
Explicitly declaring the custom eip6963:announceProvider event prevents type errors, enables
proper type checking, and supports autocompletion in TypeScript.
Create a React Context for the EIP-6963 WalletProvider with the defined interface
WalletProviderContext with a default of null, then define the WalletProvider component.
The WalletProvider component wraps all other components in the dapp, providing them with the
necessary data and functions related to wallets.
Add the following code to src/hooks/WalletProvider.tsx to create the React Context with the defined interface:
export const WalletProviderContext = createContext<WalletProviderContext>(null)

export const WalletProvider: React.FC<PropsWithChildren> = ({ children }) => {
  const [wallets, setWallets] = useState<Record<string, EIP6963ProviderDetail>>({})
  const [selectedWalletRdns, setSelectedWalletRdns] = useState<string | null>(null)
  const [selectedAccountByWalletRdns, setSelectedAccountByWalletRdns] = useState<SelectedAccountByWallet>({})

  const [errorMessage, setErrorMessage] = useState("")
  const clearError = () => setErrorMessage("")
  const setError = (error: string) => setErrorMessage(error)

  useEffect(() => {
    const savedSelectedWalletRdns = localStorage.getItem("selectedWalletRdns")
    const savedSelectedAccountByWalletRdns = localStorage.getItem("selectedAccountByWalletRdns")

    if (savedSelectedAccountByWalletRdns) {
      setSelectedAccountByWalletRdns(JSON.parse(savedSelectedAccountByWalletRdns))
    }

    function onAnnouncement(event: EIP6963AnnounceProviderEvent){
      setWallets(currentWallets => ({
        ...currentWallets,
        [event.detail.info.rdns]: event.detail
      }))

      if (savedSelectedWalletRdns && event.detail.info.rdns === savedSelectedWalletRdns) {
        setSelectedWalletRdns(savedSelectedWalletRdns)
      }
    }

    window.addEventListener("eip6963:announceProvider", onAnnouncement)
    window.dispatchEvent(new Event("eip6963:requestProvider"))

    return () => window.removeEventListener("eip6963:announceProvider", onAnnouncement)
  }, [])
In the above code sample, lines 4-10 are state definitions:
wallets- State to hold detected wallets.selectedWalletRdns- State to hold the RDNS of the selected wallet.selectedAccountByWalletRdns- State to hold accounts associated with each wallet.errorMessage- State to hold the error message when a wallet errors on connection.clearError- Function to clear the state inerrorMessage.setError- Function to set the state inerrorMessage(with astring).
In the above code sample, line 12 is the useEffect hook and it handles:
- Local storage retrieval - On mount, retrieves the saved selected wallet and accounts from local storage.
- Event listener - Adds an event listener for the custom
eip6963:announceProviderevent. OnAnnouncement- When the provider announces itself, update the state.- Provider request - Dispatches an event to request existing providers.
- Cleanup - A
returnstatement in auseEffectis used for cleanup. In this case it removes the event listener on unmount.
Add the following code to src/hooks/WalletProvider.tsx to connect a wallet and update the component's state:
const connectWallet = useCallback(async (walletRdns: string) => {
  try {
    const wallet = wallets[walletRdns]
    const accounts = await wallet.provider.request({method:"eth_requestAccounts"}) as string[]

    if(accounts?.[0]) {
      setSelectedWalletRdns(wallet.info.rdns)
      setSelectedAccountByWalletRdns((currentAccounts) => ({
        ...currentAccounts,
        [wallet.info.rdns]: accounts[0],
      }))

      localStorage.setItem("selectedWalletRdns", wallet.info.rdns)
      localStorage.setItem("selectedAccountByWalletRdns", JSON.stringify({
        ...selectedAccountByWalletRdns,
        [wallet.info.rdns]: accounts[0],
      }))
    }
  } catch (error) {
    console.error("Failed to connect to provider:", error)
    const walletError: WalletError = error as WalletError
    setError(`Code: ${walletError.code} \nError Message: ${walletError.message}`)
  }
}, [wallets, selectedAccountByWalletRdns])
The code uses the walletRdns parameter to identify the wallet's Reverse Domain Name System (RDNS)
for connecting.
The function performs an asynchronous operation to request accounts from the wallet provider using
the Ethereum JSON-RPC method eth_requestAccounts.
Add the following code to src/hooks/WalletProvider.tsx:
const disconnectWallet = useCallback(async () => {
  if (selectedWalletRdns) {
    setSelectedAccountByWalletRdns((currentAccounts) => ({
      ...currentAccounts,
      [selectedWalletRdns]: null,
    }))

    const wallet = wallets[selectedWalletRdns];
    setSelectedWalletRdns(null)
    localStorage.removeItem("selectedWalletRdns")

    try {
      await wallet.provider.request({
        method: "wallet_revokePermissions",
        params: [{ "eth_accounts": {} }]
      });
    } catch (error) {
      console.error("Failed to revoke permissions:", error);
    }
  }
}, [selectedWalletRdns, wallets])
wallet_revokePermission is an experimental RPC
method that might only work with MetaMask.
Configuring the revocation in a try/catch block and separating it from the rest of the cleanup
ensures that if a wallet does not support this feature, the rest of the disconnect functionality
will still execute.
Both of the previous functions use useCallback.
It is used to memoize the connectWallet function, optimize performance, and prevent unnecessary re-renders.
It ensures the function instance remains consistent between renders if its dependencies are changed.
For example, when using disconnectWallet, each time the WalletProvider component re-renders
without useCallback, a new instance of disconnectWallet is created.
This can cause unnecessary re-renders of child components that depend on this function.
By memoizing it with useCallback, React keeps the function instance consistent between renders, as
long as its dependencies (wallets and selectedWalletRdns) haven't changed, preventing unnecessary
re-renders of child components.
Although useCallback is not strictly necessary, it demonstrates best practices.
Predicting how a context provider will be used or how the dapp might change or scale is difficult.
Using useCallback can improve performance in some cases by reducing unnecessary re-renders.
Add the following code to src/hooks/WalletProvider.tsx to bundle the state and functions using contextValue:
const contextValue: WalletProviderContext = {
  wallets,
  selectedWallet: selectedWalletRdns === null ? null : wallets[selectedWalletRdns],
  selectedAccount: selectedWalletRdns === null ? null : selectedAccountByWalletRdns[selectedWalletRdns],
  errorMessage,
  connectWallet,
  disconnectWallet,
  clearError,
}

return (
 <WalletProviderContext.Provider value={contextValue}>
   {children}
 </WalletProviderContext.Provider>
)
If selectedWalletRdns is null, set selectedWallet to null.
Otherwise, retrieve the wallet details from the wallet state using the runs identifier.
If selectedWalletRdns is null, set selectedAccount to null.
Otherwise, retrieve the account address from the selectedAccountByWalletRdns state using the
rdns identifier.
Within the component's return statement, the contextValue object is constructed with all necessary
state and functions related to wallet management.
It is passed to the WalletProviderContext.Provider, making wallet-related data and functions
available to all descendant components.
The return statement wraps the children components with the context provider, allowing them to access the context values.
Add the following code to src/hooks/useWalletProvider.tsx:
import { useContext } from "react"
import { WalletProviderContext } from "./WalletProvider"

export const useWalletProvider = () => useContext(WalletProviderContext)
The useWalletProvider.tsx file provides a custom hook that simplifies the process of consuming the
WalletProviderContext.
In the code, the useWalletProvider hook is exported, which leverages the useContext hook to
consume the WalletProviderContext.
The benefit of this separate file exporting the hook is that components can directly call
useWalletProvider() instead of useContext(WalletProviderContext), making the code cleaner and
more readable.
With WalletProvider.tsx and useWalletProvider.tsx, the dapp can manage and access wallet-related
state and functionality across various components.
You can now wrap the entire application (the part that requires wallet connection and data) with a
<WalletProvider></WalletProvider> component.
Add the following code to src/utils/index.ts to wrap the app in the component:
export const formatBalance = (rawBalance: string) => {
  const balance = (parseInt(rawBalance) / 1000000000000000000).toFixed(2)
  return balance
}

export const formatChainAsNum = (chainIdHex: string) => {
  const chainIdNum = parseInt(chainIdHex)
  return chainIdNum
}

export const formatAddress = (addr: string) => {
  const upperAfterLastTwo = addr.slice(0,2) + addr.slice(2)
  return `${upperAfterLastTwo.substring(0, 5)}...${upperAfterLastTwo.substring(39)}`
}
Although formatAddress is the only function used, formatBalance and formatChainAsNum were
added as useful utility functions.
Explore Viem Formatters or other libraries for additional
formatting options.
4. Wrap components with the context provider
Replace the code in the file src/App.tsx with the following:
import "./App.css"
import { WalletProvider } from "~/hooks/WalletProvider"
// import { WalletList } from "./components/WalletList"
// import { SelectedWallet } from "./components/SelectedWallet"
// import { WalletError } from "./components/WalletError"

function App() {
  return (
    <WalletProvider>
    {/*
      <WalletList />
      <hr />
      <SelectedWallet />
      <WalletError />
    */}
    </WalletProvider>
 )
}

export default App
The child components are currently commented out, but as you create each of these components, you'll uncomment the specific lines.
Create each of the components you've defined and add the logic and UI needed to accomplish your goals:
- Discover injected providers (browser-installed wallets).
- Save those providers and selected wallet in global state (context provider).
- Supply a list of wallet providers to child components.
- Include a component map the providers to a button with icon and name.
- Have a
connectWalletfunction for each of those buttons.
- Have a
- Include a component that displays the selected wallet and info.
- Include a UI component to show errors.
5. Create the UI components
Create the components in the order that you've listed them in the App.tsx file.
Start with WalletList.tsx.
Add the following code to src/components/WalletList.tsx:
import { useWalletProvider } from "~/hooks/useWalletProvider"
import styles from "./WalletList.module.css"

export const WalletList = () => {
  const { wallets, connectWallet } = useWalletProvider()
  return (
    <>
      <h2>Wallets Detected:</h2>
      <div className={styles.walletList}>
        {
          Object.keys(wallets).length > 0
            ? Object.values(wallets).map((provider: EIP6963ProviderDetail) => (
              <button key={provider.info.uuid} onClick={() => connectWallet(provider.info.rdns)}>
                <img src={provider.info.icon} alt={provider.info.name} />
                <div>{provider.info.name}</div>
              </button>
            ))
            : <div>there are no Announced Providers</div>
        }
      </div>
    </>
 )
}
You've imported the wallets data and the connectWallet function from the useWalletProvider hook.
The component checks if there are any detected wallets using Object.keys(wallets).length > 0.
This check ensures that if no wallets are found, a message: "No wallets detected", is displayed
instead of an empty list.
If wallets are detected, Object.values(wallets).map(wallet => (...)) iterates over them and
renders a button for each one.
Object.keys(wallets)returns an array of the wallet keys (rdnsvalues). It is used here to check the length.Object.values(wallets)returns an array of the wallet objects. This is needed to map and render.- Using
wallet.info.rdnsas the key ensures that each wallet button is uniquely identified.
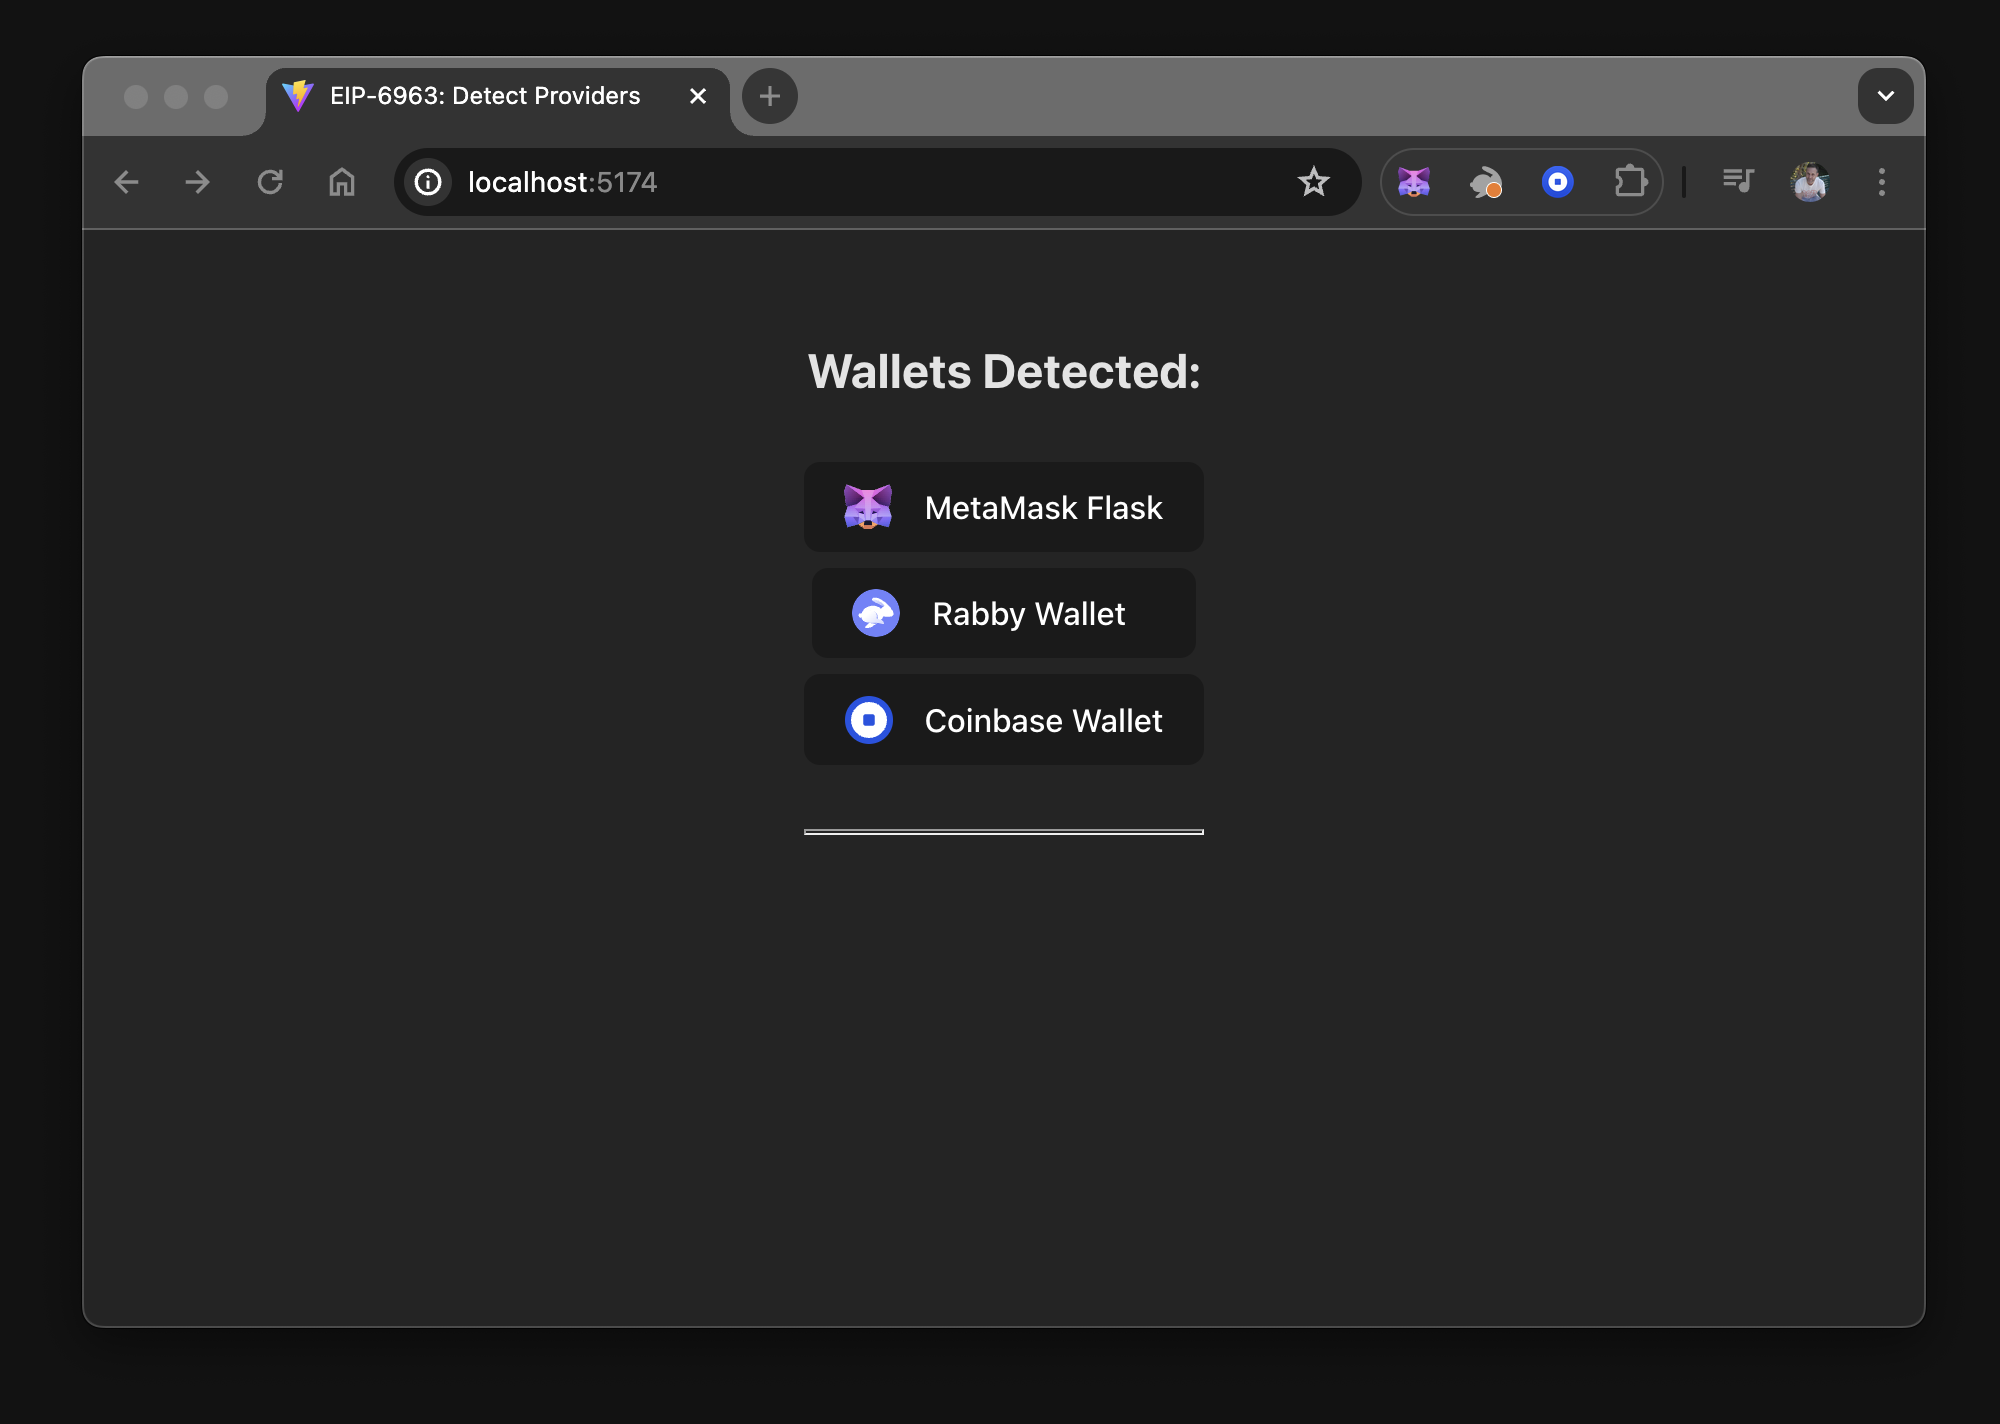
Uncomment the WalletList component in src/App.tsx and run the dapp. The following is displayed:
6. Display MetaMask data
Import the selectedWallet and selectedAccount functions, and the disconnectWallet function
from the useWalletProvider hook.
Add the following code to src/components/SelectedWallet.tsx:
import { useWalletProvider } from "~/hooks/useWalletProvider"
import { formatAddress } from "~/utils"
import styles from "./SelectedWallet.module.css"

export const SelectedWallet = () => {
  const { selectedWallet, selectedAccount, disconnectWallet } = useWalletProvider()

  return (
    <>
      <h2 className={styles.userAccount}>{selectedAccount ? "" : "No "}Wallet Selected</h2>
      {selectedAccount &&
        <>
          <div className={styles.selectedWallet}>
            <img src={selectedWallet.info.icon} alt={selectedWallet.info.name} />
            <div>{selectedWallet.info.name}</div>
            <div>({formatAddress(selectedAccount)})</div>
            <div><strong>uuid:</strong> {selectedWallet.info.uuid}</div>
            <div><strong>rdns:</strong> {selectedWallet.info.rdns}</div>
          </div>
          <button onClick={disconnectWallet}>Disconnect Wallet</button>
        </>
      }
    </>
 )
}
The code in lines 11-22 have conditional rendering for {selectedAccount && (...)}.
This conditional rendering ensures that the content inside is only displayed if selectedAccount is true.
This ensures that detailed information about the selected wallet is only displayed when an active
wallet is connected.
You can then display information about the wallet, and conditionally render anything related to the following:
- Wallet address
- Wallet balance
- Chain ID or name
- Other components that first need a connected wallet to work
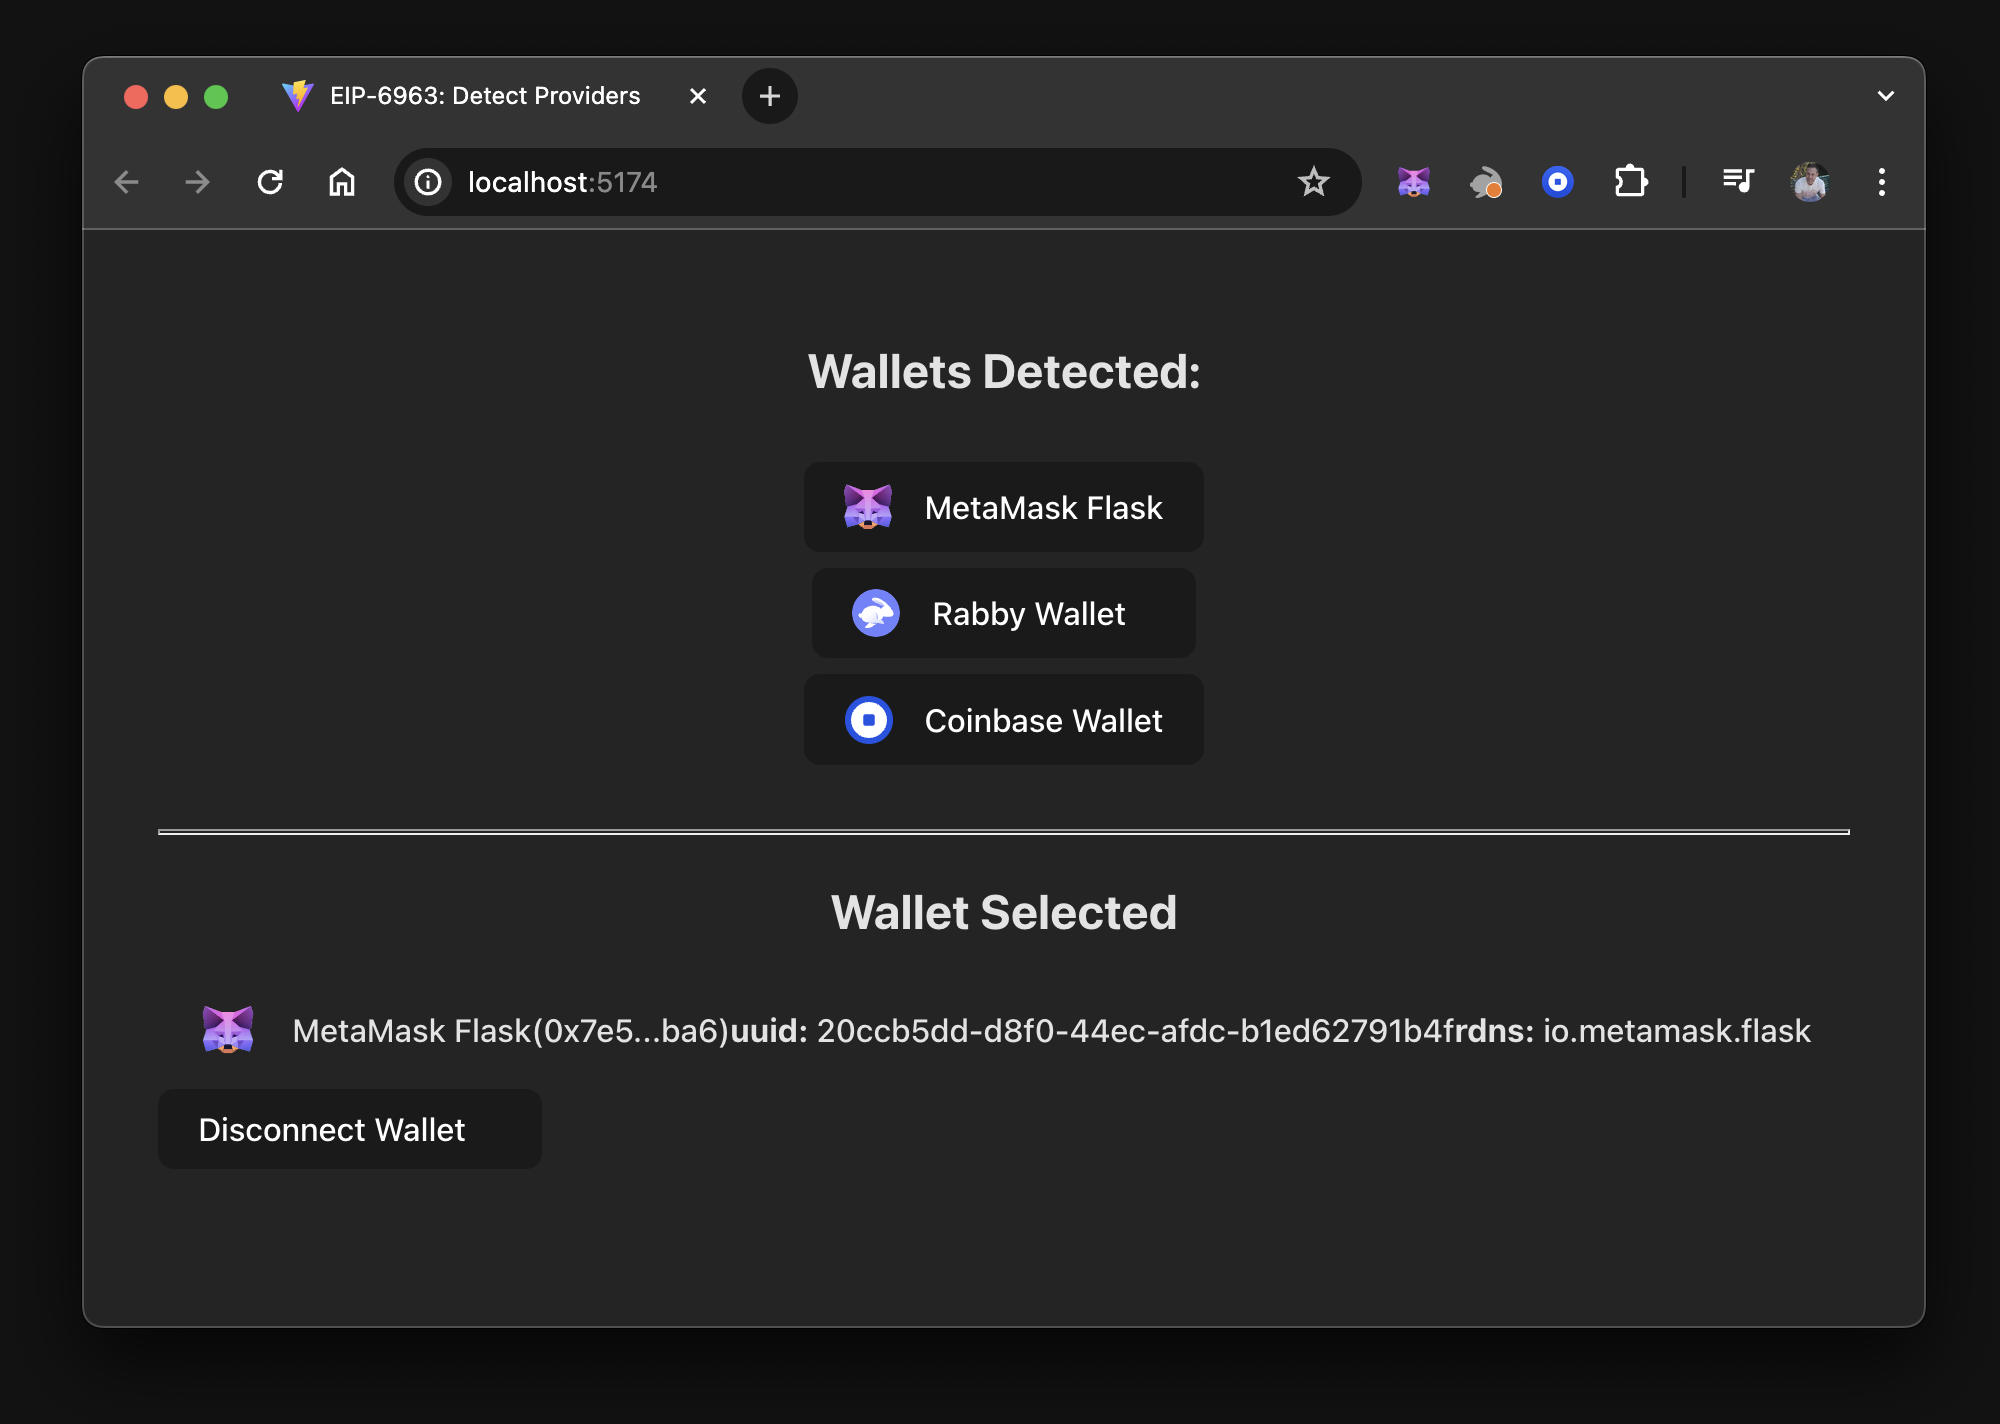
If you uncomment the SelectedWallet component in src/App.tsx, run the dapp and connect to
MetaMask, the following is displayed:
7. Show wallet connection errors
Add the following code to src/components/WalletError.tsx:
import { useWalletProvider } from "~/hooks/useWalletProvider"
import styles from "./WalletError.module.css"

export const WalletError = () => {
  const { errorMessage, clearError } = useWalletProvider()
  const isError = !!errorMessage

  return (
    <div className={styles.walletError} style={isError ? { backgroundColor: "brown" } : {}}>
      {isError &&
        <div onClick={clearError}>
          <strong>Error:</strong> {errorMessage}
        </div>
      }
    </div>
 )
}
A div with the error message renders only if errorMessage contains data.
After selecting div, reset errorMessage to an empty string, which hides the content.
This method demonstrates how to display specific content, such as a modal or notification, in response to connection errors when connecting to a wallet.
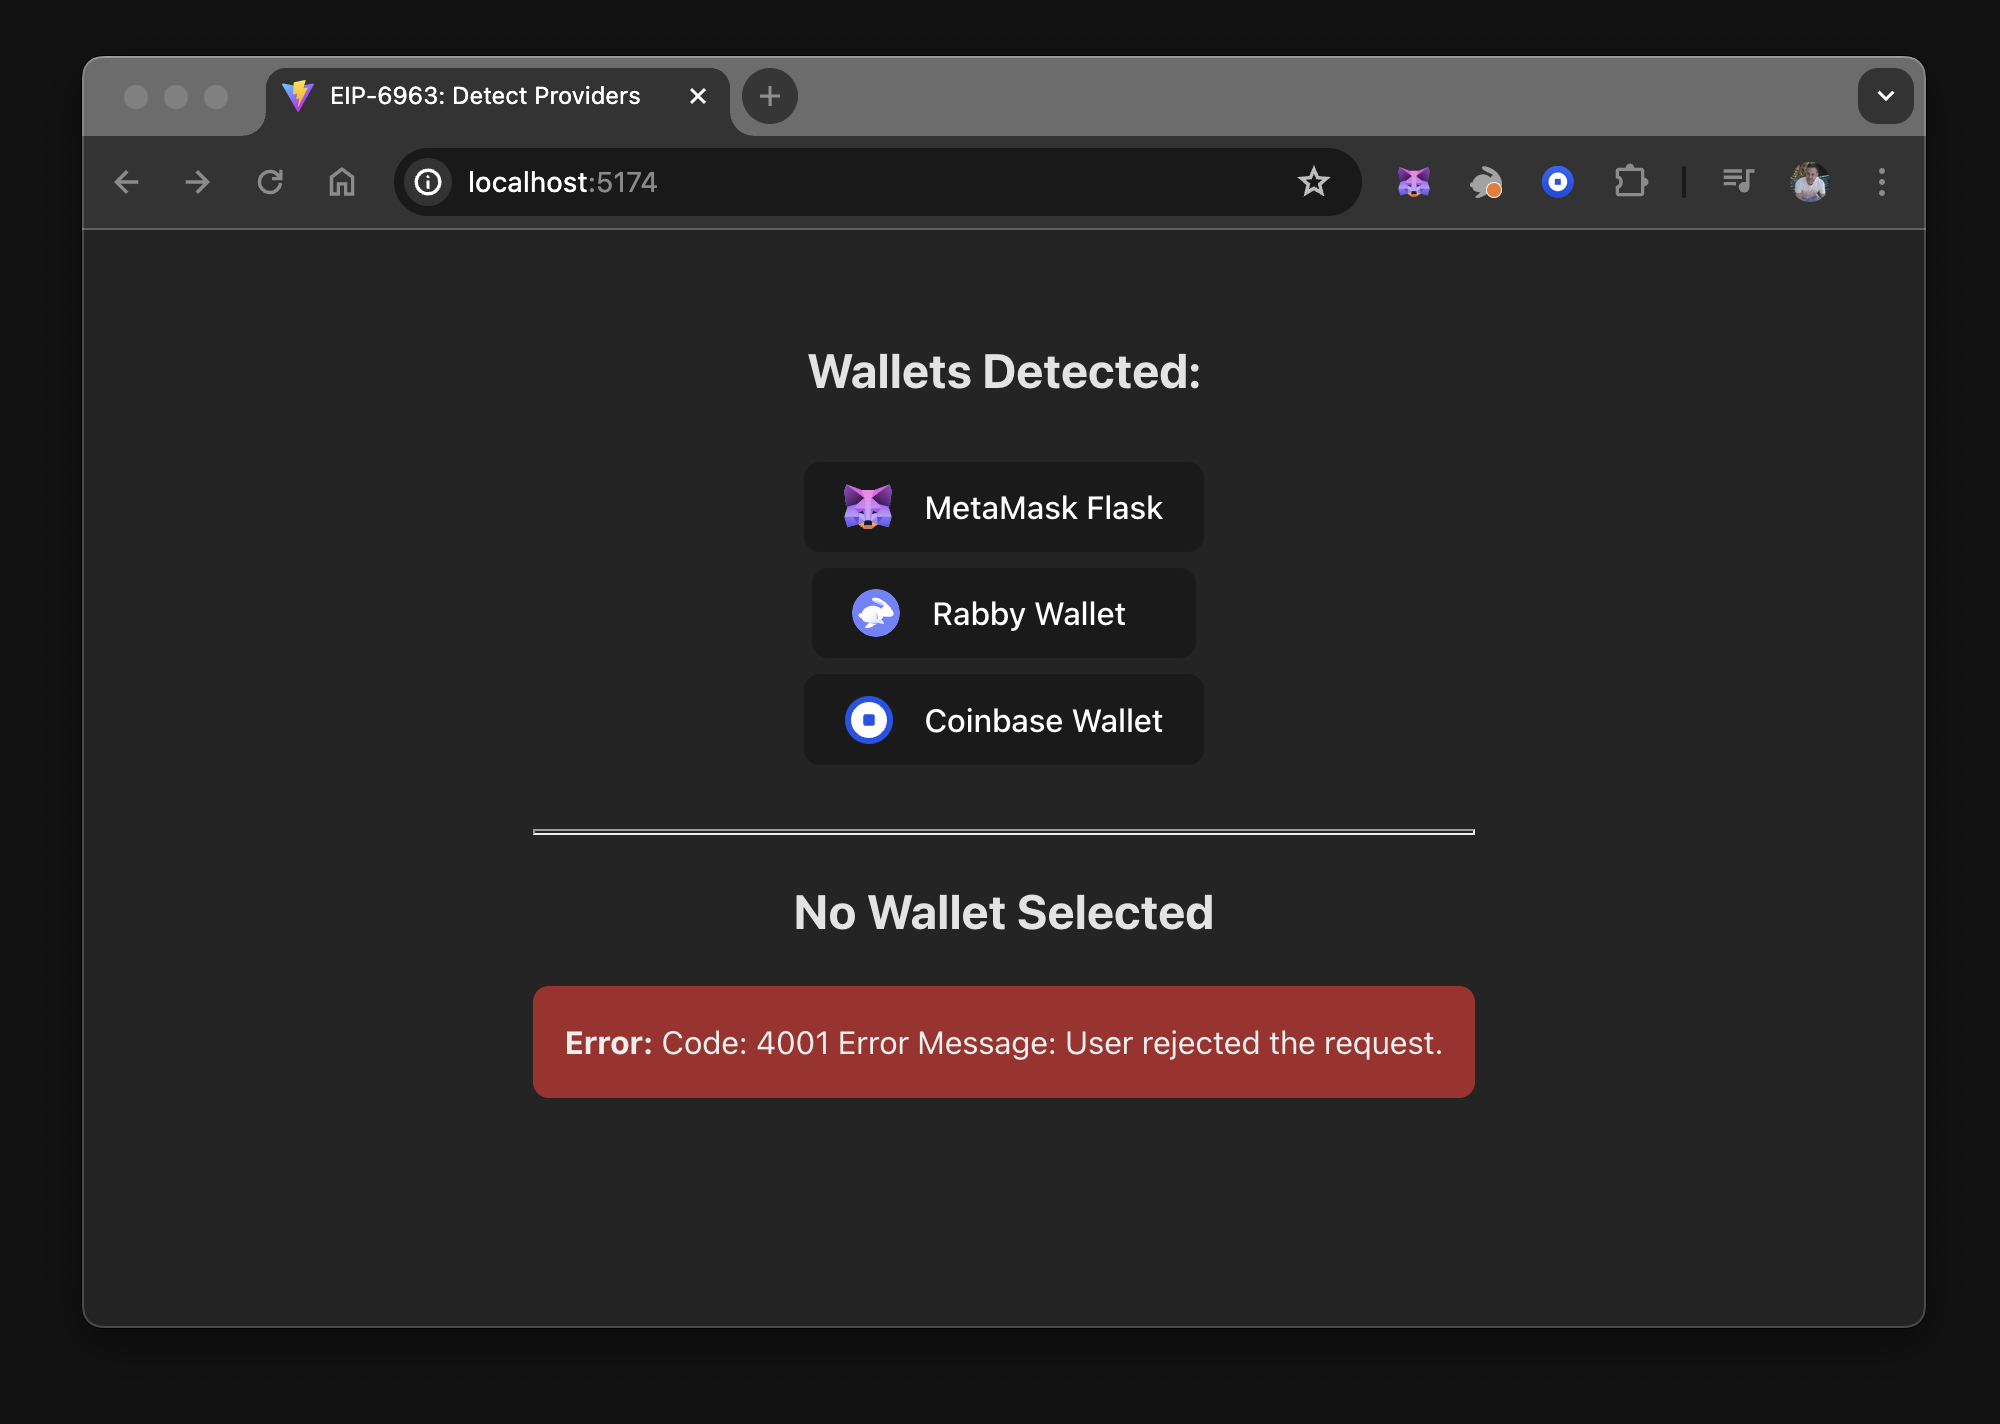
To see the error handling, uncomment the WalletError component in src/App.tsx.
Then, run the dapp, disconnect from MetaMask, reconnect, and reject or cancel the connection.
The following is displayed:
8. Run the final state of the dapp
Uncomment the code in App.tsx
import "./App.css"
import { WalletProvider } from "~/hooks/WalletProvider"
import { WalletList } from "./components/WalletList"
import { SelectedWallet } from "./components/SelectedWallet"
import { WalletError } from "./components/WalletError"

function App() {
  return (
    <WalletProvider>
      <WalletList />
      <hr />
      <SelectedWallet />
      <WalletError />
    </WalletProvider>
 )
}

export default App
Run npm run dev to view the wallet list and select a wallet to connect to.
The final state of the dapp when connected to a MetaMask wallet will look similar to the following:
9. Test the dapp features
You can conduct user tests to evaluate the functionality and features demonstrated in this tutorial:
- Test the ability to connect and disconnect from multiple wallets installed in your browser.
- After selecting a wallet, refresh the page and ensure that the selected wallet persists without reverting to No Wallet Selected.
- Select a wallet, disable it, refresh the page, then re-enable the wallet and refresh the page again. Observe the behavior of the dapp.
- When connecting to a wallet, deliberately cancel the connection or close the wallet prompt.
This action should trigger the
WalletErrorcomponent, which can be dismissed by selecting it.
Conclusion
This tutorial guided you through applying your knowledge of EIP-6963 to connect to wallets, specifically MetaMask. This method also works with any wallet that complies with EIP-6963 and supports multi-injected provider discovery. In this tutorial, you addressed edge cases and created a context provider that facilitates data sharing, manages functions for connecting and disconnecting from wallets, and handles errors. You can view the project source code for the final state of this dapp tutorial on GitHub.